


# Why Is Easy Soccer Player Drawing So Popular?
Drawing soccer players attracts both kids and adults. It’s fun, relaxing, and lets you channel your passion for the beautiful game onto paper. Easy soccer player drawing appeals to beginners because you don’t need complicated techniques or expensive materials. But why do millions search for step-by-step soccer sketches every month? According to Google Trends, searches for “easy soccer player drawing” increased by over 140 percent in the last three years (Source: Statista).
The popularity is not only about art—it’s about connecting with the sport, improving focus, and enjoying a creative break. Whether you want to illustrate your favorite forward, make your own sticker designs, or teach kids, starting with simple soccer player sketches opens a world of possibilities.

# Understanding the Basics: What Makes a Soccer Player Drawing Easy?
Many people think drawing a human figure is difficult. In reality, the process becomes much easier with the right approach and a few key techniques.
What makes an easy soccer player drawing? It uses simple shapes, clear poses, and a step-by-step breakdown of body parts. You don’t need advanced skills in anatomy or perspective. In fact, cartoonish or stick-figure soccer players are often the best starting point.
Let’s compare two popular drawing approaches used by beginners:
| Method | Complexity | Required Tools | Time Needed |
|---|---|---|---|
| Basic Stick Figure Soccer Player | Very Easy | Pencil, Eraser, Paper | 5-10 Minutes |
| Detailed Cartoon Soccer Player | Moderate | Pencil, Colored Pencils, Paper | 15-25 Minutes |
Most people start with basic shapes, then move on to cartoons. The goal is to build your confidence without feeling overwhelmed.
# Step-by-Step Guide: Draw an Easy Soccer Player Like a Pro
Ready to create your first easy soccer player drawing? Follow this beginner-friendly process:
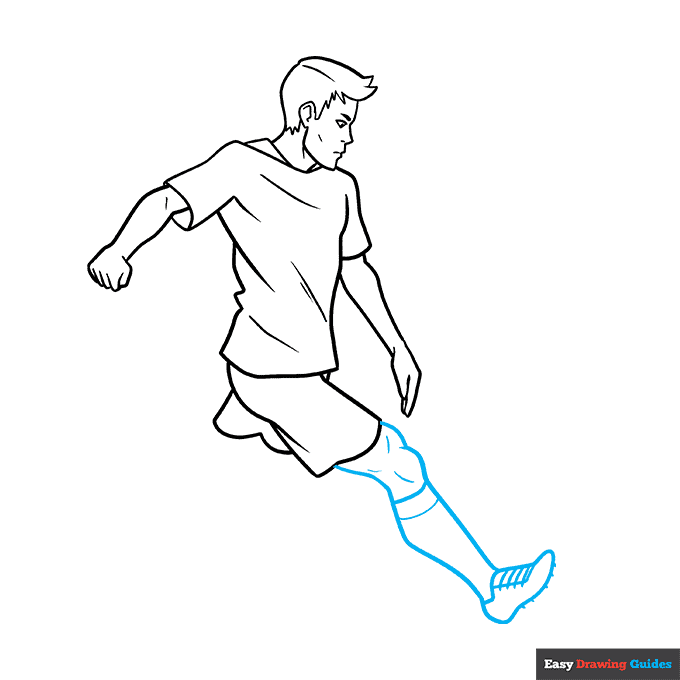
STEP 1: DRAW A HEAD
Start with a light circle in the upper part of your paper. This will be the head.
STEP 2: ADD THE BODY AND LIMBS
Using straight lines, sketch a stick-figure body: one vertical line for the spine, then lines for arms and legs. It helps to imagine the player in action—maybe kicking or running.
STEP 3: SHAPE THE JERSEY AND SHORTS
Around the stick figure, outline a simple shirt and shorts. Remember, soccer jerseys are usually loose at the sleeves and the shorts are above the knee.
STEP 4: SKETCH THE BALL AND CLEATS
Draw an oval or small circle for a soccer ball near the player’s foot. Add a few trapezoid shapes for shoes.
STEP 5: FINALIZE DETAILS AND FACE
Add hands, a basic face—just dots for eyes and a curved line for a smile. Erase unnecessary guidelines, darken the final lines, then color as desired.
According to a study by the British Council, step-by-step drawing builds children’s confidence and improves memory by nearly 30 percent compared to free-drawing (Source: British Council).
# Common Mistakes and How to Avoid Them
Even easy soccer player drawing has classic pitfalls. Let’s tackle the most frequent ones.
DISPROPORTIONATE BODIES
A common error is making heads too large or legs too short. Use guide lines to keep proportions balanced.
STIFF POSES
Soccer is about movement. Don’t forget to curve arms and legs to show action. Straight lines look unnatural.
OVERCOMPLICATING DETAILS
Many beginners add too many details too soon. Focus on basic shapes first.
LIMITED EXPRESSION
A blank face makes your soccer player less lively. Simple facial features go a long way.
### WARNING:
DO NOT PRESS TOO HARD WITH YOUR PENCIL WHEN SKETCHING INITIAL GUIDELINES. PRESSING FIRMLY MAKES IT DIFFICULT TO ERASE LATER AND CAN TEAR THE PAPER.
# Tools and Resources to Make Soccer Player Drawing Even Easier
You don’t need professional equipment or expensive software. For beginners, classic tools are more than enough. However, knowing your options helps you progress.
Here’s a quick comparison:
| Tool/Resource | Best For | Pros | Cons |
|---|---|---|---|
| Pencil and Paper | Absolute Beginners | Cheap, Portable, Erasable | No digital export |
| Drawing Tablets (e.g., Wacom) | Intermediate | Undo, Layers, Easy Color Edit | Initial Cost, Steeper Learning Curve |
| Art Apps (e.g., Procreate) | Teens & Adults | Tons of Brushes, Instant Tutorials | Requires Tablet/iPad |
According to my experience, starting with pencil and paper helps you internalize proportions and shapes. Once you’re comfortable, consider using digital apps for enhanced creativity.
If you prefer learning through video, YouTube has thousands of free soccer drawing tutorials. Search for “easy soccer player drawing for beginners”—look for channels with slow-paced explanations and clear visuals.
# Practice Ideas and Next Steps
Now you have the basics, how do you improve? Practice regularly with a clear plan! Here are some ideas:
– Try drawing soccer players in famous real-life poses—imagine Ronaldo’s jump or Messi dribbling.
– Create cartoon versions of your friends as soccer players.
– Join online forums or share your art on social platforms for feedback.
– Challenge yourself: draw both left- and right-facing players.
– Gradually add small details—like team logos or crowd backgrounds.
Most importantly, celebrate your progress. Everyone starts with rough sketches; consistency brings huge improvement.
# Easy Soccer Player Drawing Checklist: Did You Cover Every Step?
USE THIS SIMPLE CHECKLIST EVERY TIME YOU PRACTICE:
– SELECTED YOUR REFERENCE IMAGE OR POSE
– OUTLINED HEAD, BODY, AND LIMBS WITH BASIC SHAPES
– SKETCHED THE SOCCER JERSEY AND SHORTS
– DREW SHOES AND SOCCER BALL IN ACTION POSITION
– ADDED SIMPLE FACIAL FEATURES AND HANDS
– ERASED EXTRA GUIDELINES FOR A CLEAN LOOK
– ADDED OPTIONAL COLORS OR TEAM LOGO BADGES
– DOUBLE-CHECKED THE DRAWING FOR PROPORTIONS AND ENERGY
With these tips and techniques, your easy soccer player drawing journey will become both fun and rewarding. Remember—creativity matters more than perfection. Happy sketching!


